I like the game snake — not so much playing it, but implementing it. The natural consequence
is an autopilot. This way I can just watch instead of playing. On the German version of this
blog, there are already quite a few implementations with different heuristics, but nothing
particularly good at playing Snake.
But now I present an autopilot which can (at least sometimes) play a perfect game of Snake.
In case this gif does not convince you, this autopilot can run directly in the browser
at snake.schawe.me.
So, how does it work?
Neural Networks
If one does not know how to solve something, try to make a neural net come up with a solution.
One example of this applied to classic Atari games was this paper,
from ten years ago. We will apply this idea of reinforcement learning to snake in this post
(but of course others have done this already
[8,
9]).
The fundamental idea of reinforcement learning is quite simple. Just reward the model for
good decision, such that it may learn to make good decisions. So here we will use the score
defined as the length of the snake at the end of the game as the objective which is
maximized by good decisions.
Fortunately, there is already a lot of literature how reinforcement learning can be
implemented. We will use the actor-critic approach. So we construct a neural network
which takes the current state of the game as input and splits into two heads. One
head is the Actor with 3 outputs, which correspond to the next action to take: “right”,
“left” or “straight ahead”. The other head is the Critic with one output representing
an estimate of how long the snake can grow from the current situation.
For training a full game is played by following the advice of the Actor plus a bit of noise
to explore new strategies. Then the Critic is trained with all encountered game states
to produce estimates for the final score, which should predict the score that was indeed
reached.
For training the Actor, we take states of the game, make a different decision and
ask the Critic how good the resulting situation is. Depending on the estimated quality,
we teach the actor to make this decision more or less often.
So Actor and Critic help each other at getting better and
the common part of the neural net should gain an “Understanding” of the game which both
can base their output on. Ingenious!
Technical Trivialities
My Implementation uses the Python libraries Keras and Tensorflow for training and
multiJSnake (German post) as
the environment. It is a strange decision to implement the environment in Java.
The reason is that it already existed and the combination offered the opportunity
to write a post on the
blog of my employer.
For this post, we will just treat the environment as a black box, which enforces the
rules of Snake.
Lokal Information
One of the most important decisions when designing the model is to determine
the nature of the input. The simplest option, which is quite suited for testing,
is using the local information around the head of the snake: three neurons (0 or 1)
indicating whether the field right, left and ahead are occupied by a wall or the
snake body (and eight more for the diagonals and two fields, left, right, ahead and behind
for a bit more farsightedness). Also we have to indicate where the food is, which
we solve with 4 further neurons (0 or 1) representing whether the food is left,
right, in or against the direction of the snake’s movement.
Behind the input we build a fully connected layer and behind that we
connect directly the two heads.

And after a few thousand training games
the snake moves directly towards the food and avoids itself. But it is not
yet clever enough to avoid catching itself in loops.
Well, even the heuristic of rsnake (German post)
was better.
Global Information
To avoid the snake trapping itself, we should give it global information of the
playing field — it is only fair, since humans do see the whole field, too.
But even with a $10 \times 10$ field, there would be at least 100 input neurons,
such that fully connected layers would lead to very large models. Instead,
convolutional neural networks
seem like a very good fit to solve this problem, especially since our input is
of two-dimensional nature. To make life for our artificial intelligence a bit
easier, we split our playing field in three channels
- the Head: only the position of the head has a 1, otherwise 0
- the body: the positions of the body have a value corresponding to the number of timesteps they will be occupied
- the food: only the position of the food has a 1, otherwise 0
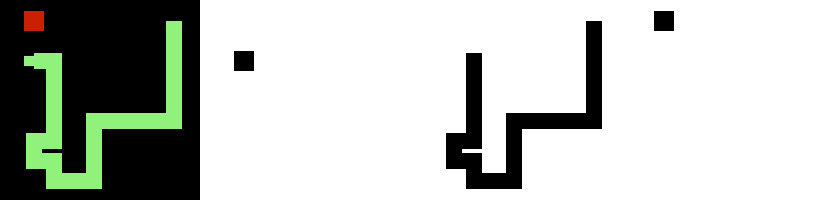
This is not even an advantage for the snake, since a human player also sees with three
color channels.
And to make life for our snake even easier, we change the output of the actor from
three relative (left, right, ahead) to four absolute (north, east, south, west) directions.

This model layout deserves to be called deep learning. The other model parameters
can be looked up at github.com/surt91/multiJSnake.
And after a few tenthousand training games this model works well enough to
routinely play perfect games on a $10 \times 10$ field.
And since I only trained it on a $10 \times 10$ field, it fails on every other size.